
Blog
Bokashi in organic cannabis cultivation

Indoor composting for indoor growing
Japan has a new export hit: Bokashi, translated as "fermented organic material". With this kind of composting, you can use your food scraps to cultivate helpful microorganisms, which is very interesting for all friends of organic cannabis cultivation.
Bokashi creates an extremely lively substrate, which creates optimal development conditions for the plants. The effective microorganisms contained are also called "Bokashi starters". Existing organic acids, amino acids and carbohydrates are catalysed and thanks to the interaction of the various biological substances, an optimally balanced biological life is formed.
What exactly is Bokashi?
Bokashi is an odourless composting method that can be made right in the kitchen. It is an excellent way to turn kitchen waste into nutrient-rich liquid fertiliser. Cannabis plants will love it and reward you with an abundant harvest.
Bokashi uses beneficial bacteria to break down plant waste. Composting takes place without the appearance of harmful mould. As a result, you get a valuable liquid fertiliser that is purely organic and contains partially fermented compost solids.
The Bokashi container is odourless and insect-free and can therefore be stored very well in the kitchen. Place the container in a cool and dark place. The Bokashi microorganisms do not tolerate high temperatures.
Bokashi- What do you have to consider?
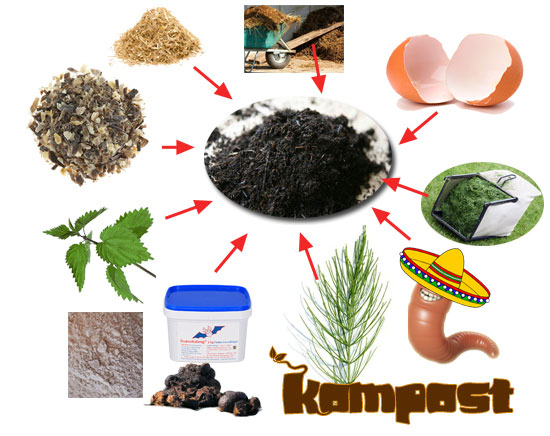
Bokashi composters are not as finicky as worm farms and can be filled with almost all food scraps. However, for organic cannabis cultivation indoors, we recommend using only plant waste (fruits, vegetable scraps, plant parts). If you want to make a special fertiliser for your cannabis plants, you can also experiment a little at this point with particularly rich ingredients that produce a real energy drink for your plants. A targeted filling of alfalfa, soybean sprouts, horsetail, stinging nettle and other organic fertilisers results in a productive organic fertiliser that can even be adapted to the respective development stage of the plant.
The following points should be considered:
- Use only plant-based ingredients and leftovers (fruits, vegetable leftovers, plant parts)
- avoid adding too much liquid ingredients
- No addition of milk, dairy products or animal faeces
- Avoid adding rotten food
- chop up large pieces
- always close the lid tightly
- Press down plant remains and food scraps well in the bucket
- Do not add water
- Do not place the bucket in the sun
- Clean the bucket thoroughly after each use
- dare to experiment and use different plant parts
Fill the Bokashi container step-by-step:
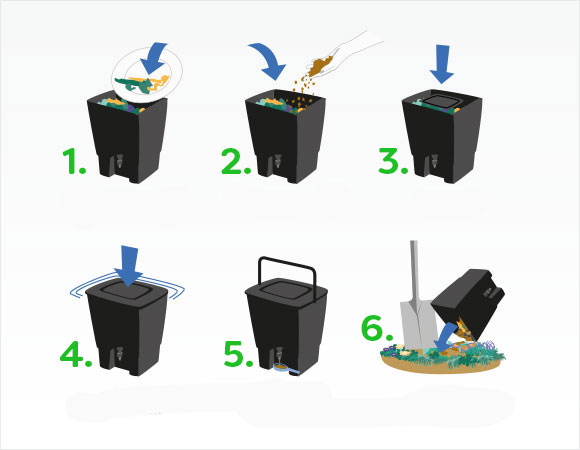
- The Bokashi container can simply be filled with vegetable kitchen waste or specifically with certain plant organic ingredients. Kitchen waste should be shredded into small pieces and placed in the container in an even layer of about 1-2cm.
- Afterwards, add enough Bokashi spray/Bokashi ferment, which contains a large amount of microorganisms.
- Press and squeeze the contents in the bohashi container as far down as possible to reduce air bubbles and air pockets in the bucket. You can use a potato masher for this, for example.
- Now the Bokashi container should be closed tightly. If air can get inside, the container will start to stink. Make sure that the lid fits tightly.
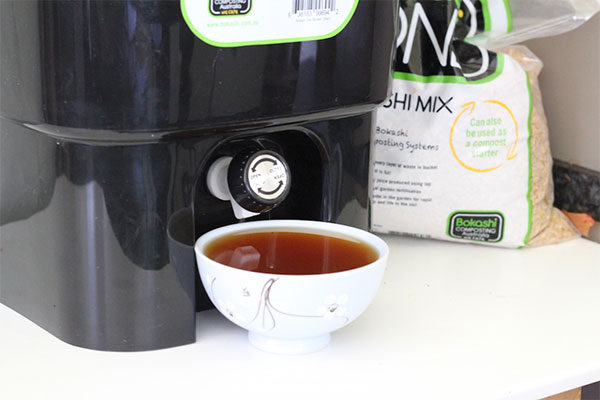
- The process of breaking down the plant remains produces a liquid with very many microorganisms: the valuable Bokashi juice. There is usually a tap at the bottom of the Bokashi bucket. This should be used to drain the nutrient-rich liquid every few days.
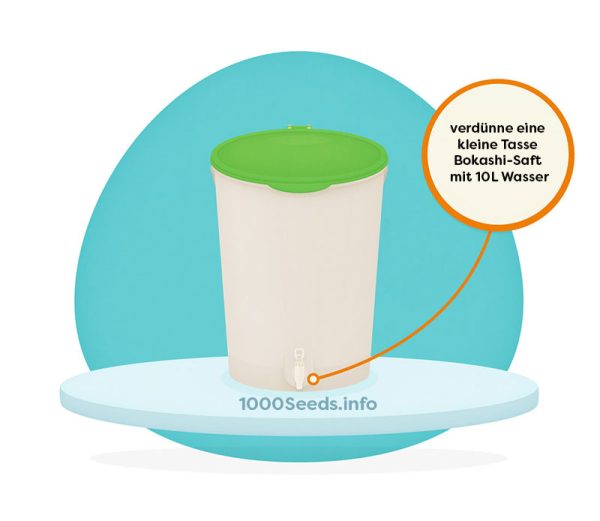
Bokashi juice is excellent for fertilising cannabis plants and is highly concentrated.
Dilute 1 small cup of Bokashi juice with 10L of water.
When bad smell occurs....
Bokashi buckets should have a slightly acidic smell. However, if there is a bad smell, rotting of the waste is probably taking place instead of the desired fermentation process. In this case, the contents should be put outside in the garden and mixed into the soil, the bokashi bucket thoroughly cleaned and a fresh start made.
so that this does not happen in the future, a few points should be observed:
- always close the lid tightly
- always add enough Bokashi spray/Bokashi ferment
- regularly release Bokashi juice via the Han on the container
- keep the container in a cool place
The Bokashi bucket should ideally be completely emptied and cleaned every 2 weeks to avoid the occurrence of bad odours or grey mould.
White mould appears
If you find white mould or a layer of white mould in your Bokashi container, this is a normal process resulting from the multiplication of beneficial microorganisms. It is all good and you do not need to do anything in this case.

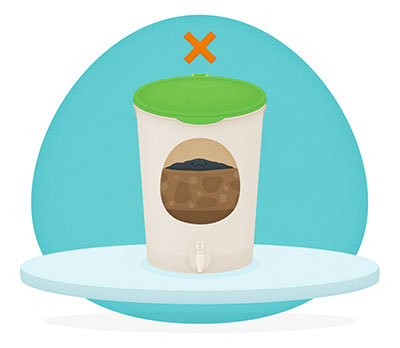
Blue-grey mould appears
If blue-grey mould appears, this is a sign that the vegetable remains are rotting instead of fermenting. In this case, the container should be completely emptied and cleaned.
Every 2 weeks, the Bokashi bucket is emptied, placed outside in the garden with the plants and mixed in with the soil. Within approx. 4 weeks, the contents mix with the soil and release valuable nutrients to the plants.
If you notice that the container is filling up too quickly or you need a larger amount of Bokashi juice, it makes sense to use a second Bokashi container. That way you can fill one while the second one ferments. But always remember to empty the juice from both Bokashi buckets regularly.
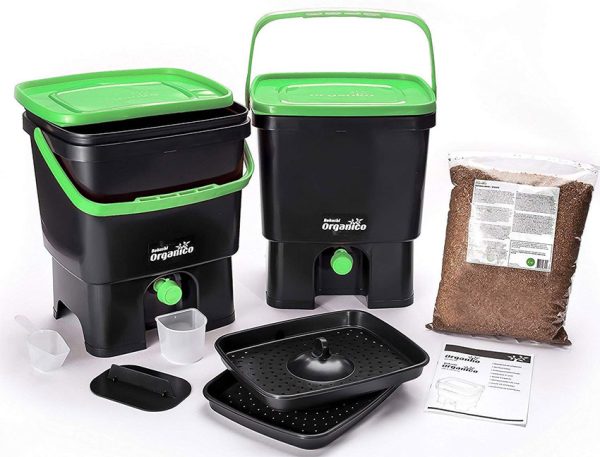
Bokashi buckets are commercially available in sets that contain all the necessary microorganisms, parts and the finished ferment.
Homemade Bokashi Ferment/Bokashi Starter
The grower is himself!
In the long run, it is cheaper to produce the bokashi ferment you need yourself. However, it is also more time-consuming. The Bokashi ferment can also be added to the plants in the planter itself, because here it nourishes and stimulates existing and added microorganisms and is therefore an excellent fertiliser.
This is how you make the Bokashi ferment yourself:
You need:
- 1.5 tablespoons Microorganisms EM-1
- 3 tablespoons wheat bran/cereal bran
- 1.5 tablespoons molasses
- 3 cups water
- Bowl
- Plastic bag
This is how it works:
- Dissolve the molasses in the water.
- Add EM-1 to the molasses solution
- add the wheat bran to the bowl and ⅔ of the molasses solution.
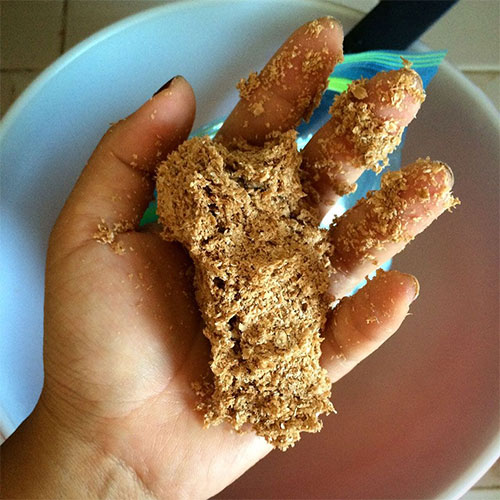
- mix everything together and knead it well. The best way to do this is with your hands. If it can be formed into a ball like the picture and sticks, it is perfect. If it is too wet, add bran, if it is too dry, add water.
5. Once the right amount of moisture is present and the wheat bran mixture can be shaped, you can put it into the plastic bag.
6. try to squeeze and press as much air as possible out of the zipper bag and the mass. The mass in the bag should be kept airtight and dark for 2 weeks. In this airtight and dark environment, the microorganisms begin to ferment the wheat bran.
After about 2 weeks, open the ziplock bag. The contents have a sweet and sour smell. A white layer of mould may have formed, which is very good.
If you see grey-blue mould, something has gone wrong and the wrong microorganisms have been able to spread. Discard this bad mass and start again. To preserve the wheat bran mass for a longer period of time, it can be dried. To do this, spread it out in a thin layer in a tub or tray and let it air dry. So now you have your ready-made bokashi ferment, which is always needed in this particular composting method and should be used in abundance. The Bokashi starter is a valuable fertiliser in organic cultivation, as is the liquid Bokashi juice that is produced during composting.
With this in mind, happy composting to all organic growers and good luck experimenting and trying out your own mixes.